Today, let’s conduct an experiment where we’ll attempt to implement route leak in Juniper devices in different ways (between VRFs, and between VRF and the main table).
Before starting the topic, I must introduce this topology and the relationship between VRFs and interfaces.
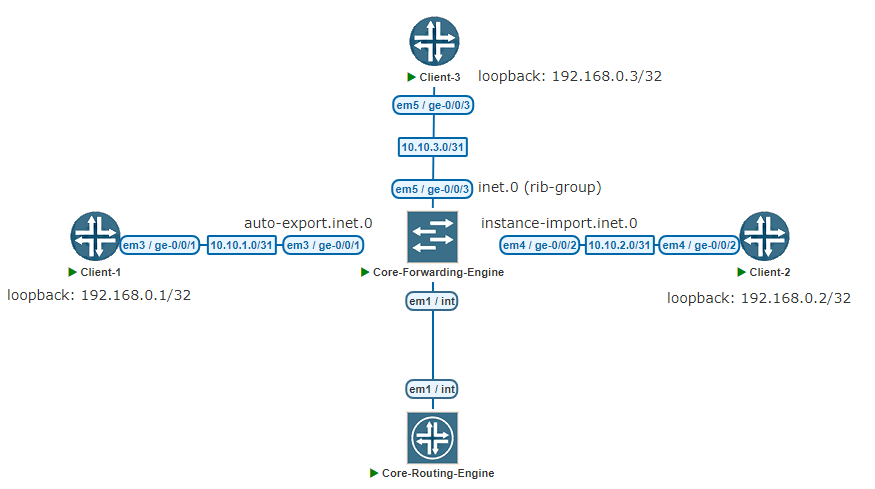
Now, there are four routers in view. Each client router is connected to the core router.
In this topology, the routing instance, interface IP addresses, and static routes are pre-configured.
We have three methods for route leaking, and each has its own advantages and disadvantages. I’ll elaborate on each one.
Our aim is to enable communication between them.
1. Topology Explanation
Before diving into the experiment, it’s crucial to grasp the relationship between VRF and interface, along with the topology’s pre-configurations.
So, let’s review the logical topology:
Below, you can see the relationships between the VRFs and interfaces:
Client-1 --> ge-0/0/1 ( VRF: auto-export )
Client-2 --> ge-0/0/2 ( VRF: instance-import )
Client-3 --> ge-0/0/3 ( Global Routing table )
Next, let’s examine the pre-configurations of the routing instance on the core router:
root@Core-RE> show configuration routing-instances
auto-export {
    instance-type vrf;
    #Only "VRF" instance types support route leaking with "auto-export"
    routing-options {
        static {
            route 192.168.0.1/32 next-hop 10.10.1.1;
            #Client-1 router loopback address, pointed to Client-1 ge-0/0/1.0
        }
    }
    interface ge-0/0/1.0;
    #If you are using vlan subinterfaces, please specify the specific unit clearly.
    route-distinguisher 10.0.0.0:100;
    #Each instance should have its own unique route-distinguisher
    vrf-import vpn-import;
    vrf-export vpn-export;
    #For routing instances engaging in route leak with each other:
    #Their import and export extcommunity values must match.
    #E.g., if "auto-export" instance has an export extcommunity of 65000:100,
    #then "instance-import" should have an import extcommunity of 65000:100 and vice versa.
    vrf-table-label;
}
instance-import {
    instance-type vrf;
    routing-options {
        static {
            route 192.168.0.2/32 next-hop 10.10.2.1;
        }
    }
    interface ge-0/0/2.0;
    route-distinguisher 10.0.0.0:101;
    vrf-import vpn-import;
    vrf-export vpn-export;
    vrf-table-label;
}

root@Core-RE> show configuration routing-options
static {
    route 192.168.0.3/32 next-hop 10.10.3.1;
    #Client-3 router loopback address, pointed to Client-3 ge-0/0/3.0
}

root@Core-RE> show configuration policy-options
policy-statement vpn-export {
    term export-vpn-routes {
        from protocol [ direct local static ];
        then {
            community + vpn;
            accept;
        }
    }
}
#Match the following types of routes, and mark with this extended community when exporting
policy-statement vpn-import {
    term import-vpn-routes {
        from community vpn;
        then accept;
    }
}
#Import routes with the extend community of target:65000:100
community vpn members target:65000:100;
#Define the community
Each client router is set up with the interface IP address and its default route directed towards the core router.
With a clear understanding of the pre-configurations and their roles, we can now begin the route leak deployment!
2. Deploy Route Leak
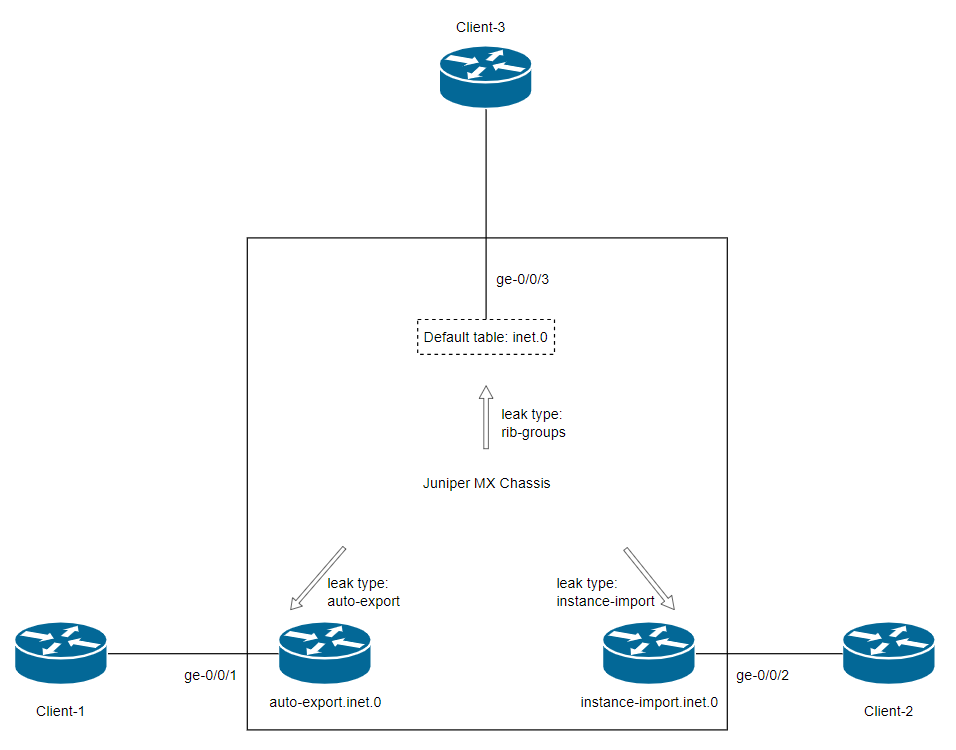
Let’s delve into each method. There are three methods available on Juniper devices: Auto-export, instance-import, and RIB-groups.
The first method we’ll explore is Auto-export.
2.1 Auto-Export
Auto-export facilitates the export of routes between local routing instances by matching with the extended community.
For further information, you can check the Juniper Knowledge Base.
Firstly, we’ll leak the route between instance-import.inet.0 and auto-export.inet.0
The configuration is simple, just one line:
root@Core-RE# show routing-instances
auto-export {
    routing-options {
        auto-export {
            family inet {
                unicast;
            }
        }
{..snip..}

instance-import {
    routing-options {
        auto-export {
            family inet {
                unicast;
            }
        }
{..snip..}
You might wonder why both instances have the same configuration and why there are no inet.0 related configurations present. Allow me to clarify.
Auto-export is exclusive to VRF instances. Other instance types, including the global table, are incompatible with the auto-export function.
If you use auto-export for route leaking, you need to configure this command in every VRF instance involved in the leak, otherwise, the leak will not take effect.
Route leaking via auto-export only occurs between VRF instances that have this command configured.
If you aim to achieve route leaking across different types of routing instances, you’ll likely need to use other methods.
Now we can begin the test:
root@Core-RE> show route table auto-export.inet.0

auto-export.inet.0: 6 destinations, 6 routes (6 active, 0 holddown, 0 hidden)
+ = Active Route, - = Last Active, * = Both

10.10.1.0/31       *[Direct/0] 2d 00:05:31
                    >  via ge-0/0/1.0
10.10.1.0/32       *[Local/0] 2d 00:05:31
                       Local via ge-0/0/1.0
10.10.2.0/31       *[Direct/0] 01:41:48   # Direct route from instance-import.inet.0
                    >  via ge-0/0/2.0
10.10.2.0/32       *[Local/0] 01:41:48
                       Local via ge-0/0/2.0
192.168.0.1/32     *[Static/5] 1d 23:53:58
                    >  to 10.10.1.1 via ge-0/0/1.0
192.168.0.2/32     *[Static/5] 01:41:48
                    >  to 10.10.2.1 via ge-0/0/2.0   # Static route from instance-import.inet.0

root@Core-RE> show route table instance-import.inet.0

instance-import.inet.0: 6 destinations, 6 routes (6 active, 0 holddown, 0 hidden)
+ = Active Route, - = Last Active, * = Both

10.10.1.0/31       *[Direct/0] 01:41:55   # Direct route from auto-export.inet.0
                    >  via ge-0/0/1.0
10.10.1.0/32       *[Local/0] 01:41:55
                       Local via ge-0/0/1.0
10.10.2.0/31       *[Direct/0] 2d 00:03:49
                    >  via ge-0/0/2.0
10.10.2.0/32       *[Local/0] 2d 00:03:49
                       Local via ge-0/0/2.0
192.168.0.1/32     *[Static/5] 01:41:55
                    >  to 10.10.1.1 via ge-0/0/1.0   # Static route from auto-export.inet.0
192.168.0.2/32     *[Static/5] 1d 23:54:05
                    >  to 10.10.2.1 via ge-0/0/2.0

root@Client-1> ping 192.168.0.2 source 192.168.0.1 count 2
PING 192.168.0.2 (192.168.0.2): 56 data bytes
64 bytes from 192.168.0.2: icmp_seq=0 ttl=63 time=71.825 ms
64 bytes from 192.168.0.2: icmp_seq=1 ttl=63 time=3.850 ms

--- 192.168.0.2 ping statistics ---
2 packets transmitted, 2 packets received, 0% packet loss
round-trip min/avg/max/stddev = 3.850/37.837/71.825/33.988 ms
Observably, both routing instances now have each other’s routes, and the Client-1 router can successfully access the loopback address of the Client-2 router.
Advantages:
- Easy to use
- Convenient to manage
Disadvantages:
- Can only be used between “VRF” instances; other types of instances cannot use it ( including the Global table ).
That went smoothly! Now, let’s remove the auto-export related configuration from the instance-import routing instance and proceed to the next method: Instance Import.
2.2 Instance-Import
The “instance-import” method offers a lightweight and straightforward approach to route leaking.
It’s commonly utilized within “Virtual-Router” and “Forwarding” instance types, and it encompasses the global table too. It does not affect the configurations of other routing protocols.
With minimal configuration required, its logic is straightforward: match the source instance with the route type (or even specific routes if needed).
Here is a simple example:
root@Core-RE> show configuration routing-instances instance-import routing-options
static {
    route 192.168.0.2/32 next-hop 10.10.2.1;
}
instance-import instance-import;
#Apply the policy within the "instance-import" instance

root@Core-RE> show configuration policy-options policy-statement instance-import
term import-from-global {
    from {
        instance master;
        protocol [ direct local static ];
    }
    then accept;
}

#The policy can also be applied to the global routing table. see:
root@Core-RE> show configuration routing-options instance-import
instance-import global-import;

root@Core-RE> show configuration policy-options policy-statement global-import
term import-from-instance-import {
    from {
        instance instance-import;
        protocol [ direct local static ];
    }
    then accept;
}
Then we can check the both tables:
root@Core-RE> show route table inet.0

inet.0: 6 destinations, 6 routes (6 active, 0 holddown, 0 hidden)
+ = Active Route, - = Last Active, * = Both

10.10.2.0/31       *[Direct/0] 00:13:50   # Direct route from instance-import.inet.0
                    >  via ge-0/0/2.0
10.10.2.0/32       *[Local/0] 00:13:50
                       Local via ge-0/0/2.0
10.10.3.0/31       *[Direct/0] 2d 01:42:57
                    >  via ge-0/0/3.0
10.10.3.0/32       *[Local/0] 2d 01:42:57
                       Local via ge-0/0/3.0
192.168.0.2/32     *[Static/5] 00:13:50
                    >  to 10.10.2.1 via ge-0/0/2.0   # Static route from instance-import.inet.0
192.168.0.3/32     *[Static/5] 2d 01:27:01
                    >  to 10.10.3.1 via ge-0/0/3.0

root@Core-RE> show route table instance-import.inet.0

instance-import.inet.0: 6 destinations, 6 routes (6 active, 0 holddown, 0 hidden)
+ = Active Route, - = Last Active, * = Both

10.10.2.0/31       *[Direct/0] 01:17:52
                    >  via ge-0/0/2.0
10.10.2.0/32       *[Local/0] 01:17:52
                       Local via ge-0/0/2.0
10.10.3.0/31       *[Direct/0] 00:20:06   # Direct route from inet.0
                    >  via ge-0/0/3.0
10.10.3.0/32       *[Local/0] 00:20:06
                       Local via ge-0/0/3.0
192.168.0.2/32     *[Static/5] 01:17:52
                    >  to 10.10.2.1 via ge-0/0/2.0
192.168.0.3/32     *[Static/5] 00:20:06   # Static route from inet.0
                    >  to 10.10.3.1 via ge-0/0/3.0

root@Client-2> ping 192.168.0.3 source 192.168.0.2 count 2
PING 192.168.0.3 (192.168.0.3): 56 data bytes
64 bytes from 192.168.0.3: icmp_seq=0 ttl=63 time=4.125 ms
64 bytes from 192.168.0.3: icmp_seq=1 ttl=63 time=4.738 ms

--- 192.168.0.3 ping statistics ---
2 packets transmitted, 2 packets received, 0% packet loss
round-trip min/avg/max/stddev = 4.125/4.431/4.738/0.307 ms
Great! The “instance-import” function operates as anticipated, allowing both client-2 and client-3 to communicate with each other.
Advantages:
- Easy to use
- Not affect other routing protocols under normal circumstances
Disadvantages:
- Only support “Virtual-Router” and “Forwarding” instance types
Alright, let’s remove the instance-import configuration for inet.0 table and move on to the next method: RIB-groups.
2.3 RIB-groups
A RIB group is a template-like configuration, providing a way for a routing protocol to install routing information (routes, prefixes) into multiple routing tables that are defined in the Junos OS.
For further information, you can check the Juniper Knowledge Base.
RIB-group example configuration:
root@Core-RE# show routing-options
rib-groups {
    import-from-instance-import {
        import-rib [ instance-import.inet.0 inet.0 ];
        import-policy rib-group-instance-import;
    }
}
As shown in the configuration, I have set up a group named import-from-instance-import. In this configuration, the instance-import.inet.0 routing table serves as the source table, while the subsequent table functions as the destination.
Additionally, you have the option to specify multiple destinations, like:
root@Core-RE# show routing-options
rib-groups {
    import-from-instance-import {
        import-rib [ instance-import.inet.0 inet.0 auto-export.inet.0 ];
        import-policy rib-group-instance-import;
    }
}
#Multiple destination RT, for demonstration purposes
Policies can also be established to filter the replicated routes.
Filtering can be applied based on precise routes, protocols, destination RIBs, among other criteria.
Let’s take a look at the configuration:
root@Core-RE# show routing-options
rib-groups {
    import-from-instance-import {
        import-rib [ instance-import.inet.0 inet.0 ];
        import-policy rib-group-instance-import;
    }
}
#RIB groups template, from instance-import.inet.0 to inet.0

root@Core-RE# show policy-options policy-statement rib-group-instance-import
term deny-direct-route {
    from protocol direct;
    then reject;
}
#Reject direct route
term allow-static-route {
    from protocol static;
    then accept;
}
term last {
    then reject;
}
#In RIB groups policy, only the static routes will be copied.

root@Core-RE# show routing-instances instance-import
routing-options {
    interface-routes {
        rib-group inet import-from-instance-import;
    }
    static {
        rib-group import-from-instance-import;
        route 192.168.0.2/32 next-hop 10.10.2.1;
    }
{..snip..}
#Apply the RIB groups within the "instance-import" routing instance.
You might be wondering why I applied RIB-groups under the interface-routes and static hierarchy within the instance-import routing instance.
The reason is that RIB-groups are “protocol-based” and they need to be implemented at the source from where the routes are to be exported.
For example, to leak the OSPF route from instance-import.inet.0 to inet.0, the configuration set routing-instances instance-import protocols ospf rib-groups inet import-from-instance-import is necessary, along with configurations for other protocols.
( Do not forget to update your policy statement, xD )
Having wrapped up the configuration, let’s review the routing table and test the connectivity:
root@Core-RE> show route table inet.0

inet.0: 4 destinations, 4 routes (4 active, 0 holddown, 0 hidden)
+ = Active Route, - = Last Active, * = Both

10.10.3.0/31       *[Direct/0] 2d 17:33:02
                    >  via ge-0/0/3.0
10.10.3.0/32       *[Local/0] 2d 17:33:02
                       Local via ge-0/0/3.0
192.168.0.2/32     *[Static/5] 00:32:06   # Static route from instance-import.inet.0 ( RIB-groups )
                    >  to 10.10.2.1 via ge-0/0/2.0
192.168.0.3/32     *[Static/5] 2d 17:17:06
                    >  to 10.10.3.1 via ge-0/0/3.0

root@Core-RE> show route table instance-import.inet.0

instance-import.inet.0: 6 destinations, 6 routes (6 active, 0 holddown, 0 hidden)
+ = Active Route, - = Last Active, * = Both

10.10.2.0/31       *[Direct/0] 17:09:43
                    >  via ge-0/0/2.0
10.10.2.0/32       *[Local/0] 17:09:43
                       Local via ge-0/0/2.0
10.10.3.0/31       *[Direct/0] 16:11:57   # Direct route from inet.0
                    >  via ge-0/0/3.0     # ( routing-options instance-import )
10.10.3.0/32       *[Local/0] 16:11:57
                       Local via ge-0/0/3.0
192.168.0.2/32     *[Static/5] 00:33:56
                    >  to 10.10.2.1 via ge-0/0/2.0
192.168.0.3/32     *[Static/5] 16:11:57   # Static route from inet.0 ( same as above )
                    >  to 10.10.3.1 via ge-0/0/3.0

root@Client-3> ping 192.168.0.2 source 192.168.0.3 count 2
PING 192.168.0.2 (192.168.0.2): 56 data bytes
64 bytes from 192.168.0.2: icmp_seq=0 ttl=63 time=3.319 ms
64 bytes from 192.168.0.2: icmp_seq=1 ttl=63 time=4.460 ms

--- 192.168.0.2 ping statistics ---
2 packets transmitted, 2 packets received, 0% packet loss
round-trip min/avg/max/stddev = 3.319/3.889/4.460/0.571 ms
We’ve successfully completed the RIB group configuration, allowing Client-2 and Client-3 to communicate seamlessly.
Advantages:
- Employs a template-driven approach for route leaking, making it particularly convenient for bulk tasks such as inter-importing across multiple instances
- Supports policy-based importing
- Accommodates various instance types (with the exception of no-forwarding)
Disadvantages:
- The configuration can be intricate, necessitating engineers to possess a solid grasp of the routing table
Thank you for taking the time to read. Should you have any queries or seek further clarification, feel free to leave a comment. I’m here to help!
For the latest updates, please subscribe to my telegram channel @MAVETECHPUBLIC
If you are interested, you can check out my previous articles.
Mavetech blog operates without ads. If you found value in my article, kindly consider showing support. Your generosity is deeply appreciated!
user-799146
October 13, 2024awesome
maverick
November 19, 2024Thanks!